Posts with the label Back to School
Showing posts with label Back to School. Show all posts

July 19, 2025

Why UFLI Placement Inventories Are Your Back-to-School BFF


Hey everyone! Can you believe it's almost that time again? My classroom is still looking a little too pristine, but my teacher brain is already buzzing with all things back-to-school. And if you're like me and diving into UFLI Foundations this year (or continuing your UFLI journey!), there's one tool you absolutely have to make friends with right at the start: UFLI Placement Inventories.


Seriously, these aren't just another thing to add to your overflowing to-do list; they're your secret weapon for a smoother, more effective start to the school year. Think of them as your personal GPS for reading instruction!


Although UFLI itself is not meant to include inventories, I set out to make one for my incoming second graders. I do plan to continue the lesson-by-lesson approach whole group a little bit each day - as per the curriculum scope and sequence. However, I am always looking for ways to embed this program throughout my ELA block and utilize every minute.


So, let's take a peek at what I came up with!


Why You'll Be Besties with UFLI Placement Inventories:

  1. Pinpointing Starting Points (No More Guesswork!): Remember those first few weeks trying to figure out where everyone is at with their foundational reading skills? It can feel a bit like throwing darts in the dark, right? The UFLI placement inventories take all that guesswork out. They give you a clear, objective snapshot of what your students already know and, more importantly, what they need to learn. Are they solid on their letter sounds? Do they understand CVC words? The inventories will tell you!

  2. Supercharging Your Small Group Instruction: This is where the magic really happens! Once you have that data from the inventories, your small group instruction basically designs itself. Instead of generic skill work, you can form targeted groups based on specific needs.

    • Got a group that's rocking CVC words but needs a boost with digraphs? Boom, that's your group's focus!

    • Another group might need to solidify their short vowel sounds. Perfect, you know exactly what to do.

    This means every minute of your small group time is meaningful and tailored, preventing frustration for both you and your students.

  3. Seamless Alignment with Whole Group UFLI: Here's the brilliant part: the placement inventories are specifically designed to align with the UFLI Foundations scope and sequence. So, while you're working with your small groups on their specific needs, you're not just doing random activities. You're building the foundational skills that will directly support and accelerate their success in your whole-group UFLI lessons. It's like building the perfect bridge between individual needs and class-wide learning.

    Imagine this: you're teaching a whole group lesson on silent 'e' words. But in your small groups, you've already pre-taught or reinforced the necessary short vowel sounds for some students, while challenging others with more complex vowel patterns. Everyone benefits, and the whole-group lesson clicks into place more easily for all your learners.


Part 1: Decoding

The inventory is broken into a beginning, middle, and end of the year assessment and into two parts:

PART 1: Decoding                      PART 2: Encoding

Part 1 allows students to read from a list of words that align with the UFLI spelling patterns for 2nd grade. Part 2 is all about how students spell words using these patterns. Both parts allow for teachers to have a wide view on where students are successful and where they need help.


Forming a Focus for Small Groups


My Pro-Tip: Don't Stress, Just Assess!

I know, I know, another assessment. But trust me, the time you invest upfront in these inventories will pay dividends throughout the year. It saves you so much time and energy in the long run because you'll be teaching smarter, not just harder.


So, as you're gearing up for the new school year, make sure those UFLI placement inventories are high on your priority list. They're the key to unlocking focused instruction, boosting student confidence, and setting everyone up for a truly successful year of reading growth.


What are your favorite back-to-school assessment strategies? Share your wisdom in the comments below!


Happy teaching!


Why UFLI Placement Inventories Are Your Back-to-School BFF

July 19, 2025

June 19, 2025

My Secret Weapon for Bathroom Management
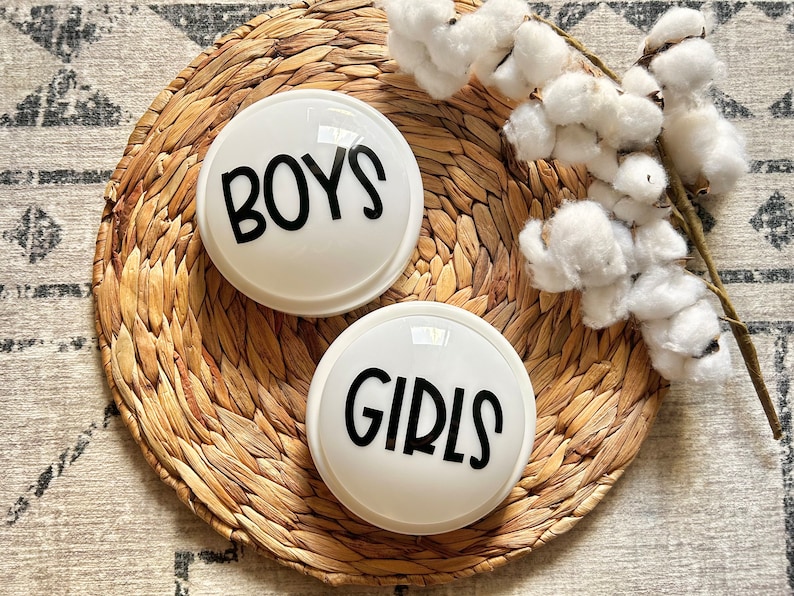

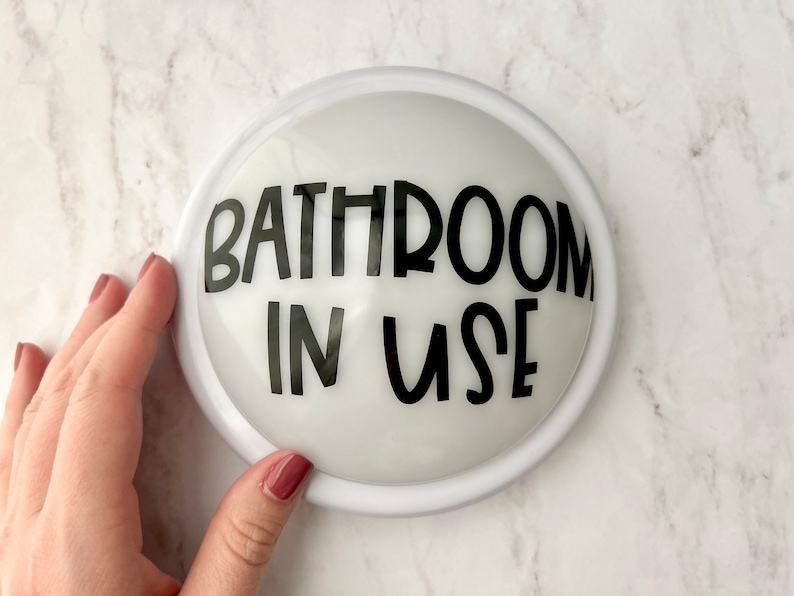
As teachers, we're constantly searching for those small, effective tweaks that can make a big difference in our classroom. We're looking for strategies that minimize disruption, maximize learning time, and give us a little more peace of mind. And let me tell you, I've found one such gem in the most unexpected of places: a simple bathroom tap light.


You might be picturing a glowing disco ball in the hallway, but trust me, this is far more practical (and less likely to induce a dance party). I'm talking about those small, battery-operated, push-button lights – the kind you might put in a closet or under a cabinet. Placed strategically on the wall next to my classroom door, this unassuming little light has become my go-to signal for bathroom availability, and it has genuinely revolutionized how I manage bathroom breaks with my students (even with my kindergartners).


Here's why this humble tap light has earned a permanent place in my classroom management toolkit and you should consider one, too:


1. Instant Visual Cue: No More Interruptions!

How many times have you been in the middle of an engaging lesson, only to be interrupted by a student whispering, "Can I go to the bathroom?" or shaking the "r" in sign language at your face during small groups? With the tap light, those interruptions are drastically reduced.


Before a student even asks, they can glance at the light. If the light is on, the bathroom is occupied. If the light is off, it's available. It's a clear, immediate visual cue that empowers students to self-monitor and prevents them from asking an unnecessary question that breaks the flow of instruction. This alone saves precious instructional minutes throughout the day.


2. Effortless Monitoring (Without Being a "Bathroom Cop")

One of the biggest benefits for me is the ability to discreetly monitor bathroom use. When a student leaves for the bathroom, they simply tap the light on. When they return, they tap it off. This simple action provides me with:


  • Awareness of Occupancy: I can quickly see if someone is in the bathroom without having to open the door or ask. This is particularly helpful when I have a student who might take a little longer or if I'm expecting someone back.
  • A Gentle Reminder for Students: The act of turning the light on and off subtly reinforces accountability. They know I'm aware they've gone, and it helps prevent excessive or prolonged bathroom breaks. It's not about being a "bathroom cop," but rather establishing a simple, respectful system.

3. A Non-Distracting, Independent System

Unlike a verbal check-in or a hand signal, the tap light is remarkably non-distracting. It doesn't require me to stop teaching, and it doesn't draw attention to the student going to the bathroom. This fosters a more independent and responsible approach to bathroom breaks for students. They learn to manage their own needs within the established system.


4. Overall Usefulness in Classroom Management

Beyond just bathroom use, the tap light embodies several key principles of effective classroom management:


  • Clarity: The rules are crystal clear – light on means occupied, light off means available.
  • Consistency: It's the same system every single time, making it easy for students to learn and follow.
  • Efficiency: It streamlines a common classroom routine, saving time and reducing friction.
  • Empowerment: Students take ownership of their bathroom breaks, fostering a sense of responsibility.


In my classroom, the tap light has become an invaluable tool. It's a small investment with a huge return in terms of reduced interruptions, improved student independence, and a smoother flow to our school day. If you're looking for a simple yet powerful way to enhance your classroom management, I highly recommend giving the humble bathroom tap light a try. You might be surprised at the difference it makes!


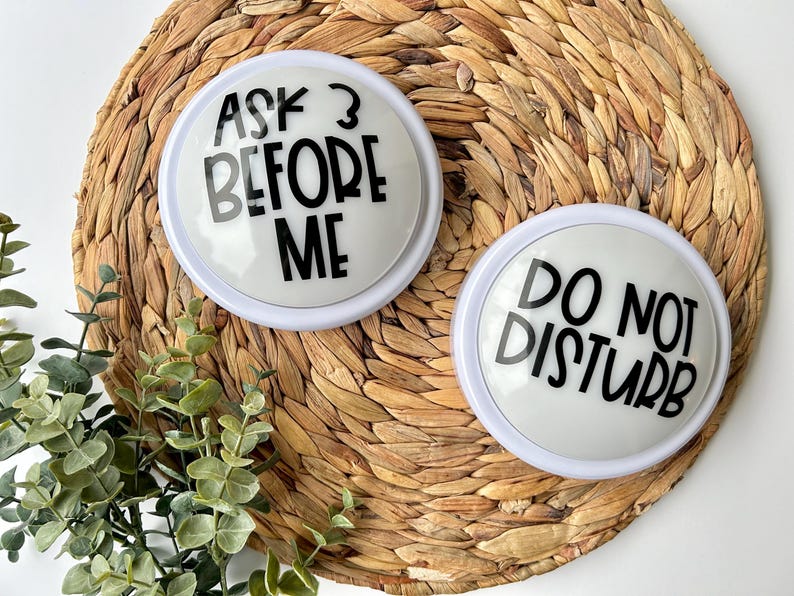
Tap Light Variations:

Bathroom in Use | Bano en Uso | Nurse | Boys/Girls
Do Not Disturb / Ask 3 Before Me | Calm Corner in Use

Common Questions:

  • I have cinder blocks in my classroom. How do these secure to the wall?
    • I used a heavy-duty velcro on the back of my light to secure to my wall. I asked my front office/custodial staff to help and it worked! Just make sure to place the velcro so you can still access the batteries when they're in need of replacing.

  • What is the lettering made of?
    • The lettering is made of high-quality permanent vinyl.


My Secret Weapon for Bathroom Management

June 19, 2025

June 5, 2025

Our Amazing Brains: A Back to School Unit


Upon the first few weeks of school teachers always set out to spend that time establishing classroom norms. You know, the routines and procedures students must learn in order for the classroom to function normally. This school year ahead, I've found myself reflecting on the needs of my class last year and thinking of ways I can better support them. That's when I realized I wanted to spend more time in those first few weeks of the new school year discussing the brain.


I knew I wanted my lessons to build upon each other and relate to how our brains help us learn and grow. In my research for this resource I found myself becoming more and more fascinated with the brain and just how awesome it is!


Lesson 1: Our Amazing Brains

In this first lesson, students are introduced to the brain and its function. It is explained as our "super computer" and they will learn that the brain can be divided into different sections:

  • Frontal Lobe (incl. prefrontal cortex): think, plan, solve-problems, our personalities
  • Parietal Lobe: movement, speed, the senses, and writing
  • Occipital Lobe: memory, sight, smell
  • Temporal Lobe: speech, language, and hearing
  • Cerebellum: balance, coordination, and fine motor skills
  • Brain Stem: connects the brain to the spinal cord
The read-aloud I've chosen for this day is Your Fantastic Elastic Brain: Stretch It, Shape It! by JoAnn Deak, PhD - a popular read on the subject! It's all about how our brains can stretch and grow! After reading and discussing the important concepts, I've included a variety of activities to choose from that will help students put into practice what they've learned.


Hands-On Activities: Labeling the Brain, Interactive Journals, or a more advanced activity, Brain Hats
  • Labeling the Brain: a straightforward worksheet where students label the lobes/parts and color code it based on the function of each part.
  • Interactive Journals: flap-book style notes where students cut and glue flaps into their journals and practice note-taking. They'll identify the part of the brain and lift the flap to write its function.
  • Brain Hats: This activity is more advanced and for those students who can handle the number of directions. But, the finished product is pretty cool and a great engaging activity. I've also included a simpler version using construction paper and step-by-step directions.

Here's a fun video to supplement your lesson:


Lesson 2: Growth Mindset

In this lesson, students will build on their knowledge of the brain and connect to how it stretches and grows when faced with new learning or challenges. They'll become familiar with the prefrontal cortex and how this part of the frontal lobe of our brains - they'll come to know it as their "boss brain."

The "boss brain" helps them: make a plan, solve puzzles, learn from mistakes, and controls feelings. This knowledge will connect them to developing a growth mindset over a fixed mindset.

The read-aloud for this lesson is the teacher favorite, The Magical Yet by Angela DiTerlizzi. It's a great story about how we respond to the things we can't do...yet. Adding this simple word to our thought process can help build our sense of overcoming the obstacles in front of us.


Activity: Growth Mindset 4-Corners
I love activities and games that get my students up and moving. This game is inspired by 4-Corners, a popular game we play during our morning meetings.

The teacher will read out different Scenario Cards and students must decide which corner best represents how their brain will think about that problem. The corners are:
  1. "I'll try again"
  2. "I'll ask for help or try a new way"
  3. "My brain is getting stronger"
  4. "Mistakes help my brain learn"
More helpful videos for supplementing your lesson:


Lesson 3: Problem-Solving Brains

In this third lesson, students will learn that our brains help us focus and solve-problems. This lesson is all about building up their understanding around how our brains approach and respond to the things that challenge us - from disagreements with a friend to a frustratingly hard math problem. By dealing with these problems head on, students build their resiliency and grow their brains.

Featured in this lesson, students will learn about neurons! New neurons grow and connect with each other during learning. The more students work and practice a skill, the stronger the neuron connections become!

The read-aloud for this lesson is What Do You Do with a Problem? by Kobi Yamada. In this story, a boy is faced with a problem and we learn how he chooses to deal with it (or even try to ignore it). This directly connects with students understanding that our brains help us solve our real-life problems! 

Activities: Problem-Solving Brains worksheet, Problem-Solving Challenge, Pipe-cleaner Neurons

You can choose between a response worksheet where students think about a problem and how their brain tells them to respond. The other choice is a more engaging activity (my favorite) and challenge.


Inside a paper bag or ziploc, the teacher will place a set of problems (there are 4 sets to choose from). I recommend using a variety of sets so students don't all have the same set of problems to think about. When you're ready to begin, students will take 1 slip of paper out and read it to themselves. Similar to 4-Corners, there will be four "Brain Power Challenge Stations" for them to choose to go to that best represents how their brains would respond to each problem.

  • Station 1: Thinking & Planning Zone (thinking of 2 ways to solve the problem)
  • Station 2: Remembering & Learning Zone (thinking of 1 way you've learned from a mistake)
  • Station 3: Creative & Idea Zone (draw a quick picture of how you might solve the problem)
  • Station 4: Brave Action Zone (strike a pose that shows you're going to take a brave step)
Once they've worked through each of the problems in their bags, they'll earn a "neuron." This slip of paper will represent how they're forming connections every time they're solving problems.

A final activity that's hands-on are pipe-cleaner neurons. I've included step-by-step directions to help guide you and your students to creating a neuron and understanding its parts.

Lesson 4: Feelings & Our Brains

This lesson is all about identifying our emotions and sets up the foundation for what will become the introduction to your calm corner or calming space in your classroom.

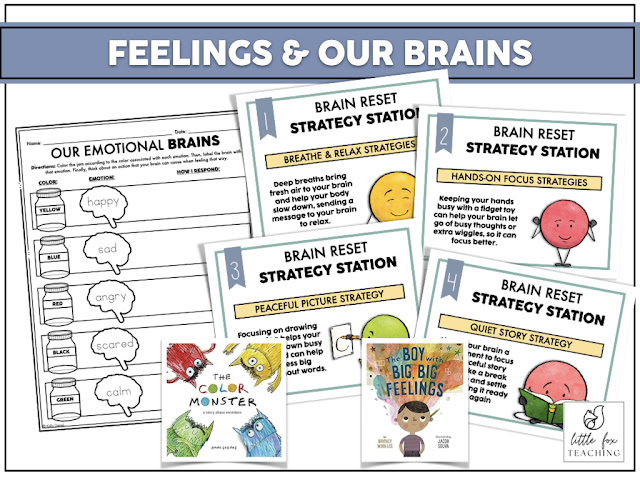
The read-aloud for this lesson is called The Color Monster by Anna Llenas. 

Activity: Our Emotional Brains worksheet
Students will identify the color association for each emotion discussed from the story. They'll then connect that feeling with how their brain is responding. As writers, this is another great opportunity for students to learn to take notes or make bullet point ideas.

Lesson 5: Regulating Our Emotions

This is the final lesson in this unit. At this point, students have spent the week learning and building their understanding around the brain and how we'll use our brains for all kinds of learning this school year. In this lesson, students will learn that their brains help control the emotions they feel and the strategies they can utilize to help calm them down.

The read-aloud for this lesson is called The Boy with the Big, Big Feelings by Britney Winn Lee. It's a great story that gets students thinking about environmental stimuli and how their brains help them manage their emotions. This story also sets up the concept that there are different strategies we can use to help calm these feelings. Discussing how people are different and have different needs is a great springboard for conversation during this lesson!

My Calm Corner at the beginning of the school year. (2024)

The Calm Corner

The activity of this lesson is introducing students to the Calm Corner in the classroom and the regulation tools that are inside of it. It's a great opportunity to have students explore these tools and learn how to appropriate use them (establishing those rules and expectations). 


Activity: Calming Strategy Stations
Students will be grouped into four groups. They'll rotate through each station and practice the calming strategy highlighted by that station. Make sure each group has the opportunity to spend 3-4 minutes in each and actively practicing the strategy. At the end, regroup with the class and have them reflect on the strategies they explored and which ones they found calmness from the most.
  • Breathe & Relax (breathing tools/cards, finger tracing, pinwheels)
  • Hands-On Focus (fidget tools, stress balls (different textures), sensory bottle)
  • Peaceful Picture (whiteboard or notepad for quick pictures, Think Sheets are another great option)
  • Quiet Story (picture books (about emotions))
After this discussion, I recommend placing just a few items at first and build on your calming station throughout the year. Reinforce the rules of the space as needed and keep tabs on how students are interacting with it. I have a whole blog post about how to set yours up and the use of Think Sheets if you're interested in learning more.

Note: When introducing the calming space in your classroom, always establish the routines/procedures for how students are to use it during the day. A timer should be used and it should be established as a special place for authentic use, not where students can avoid their problems (or accountability) or classwork.

I hope you'll find this resourceful helpful as you begin your new year with your students!


Our Amazing Brains: A Back to School Unit

June 5, 2025

July 30, 2024

Boho Minimalist Reading Rotation Cards


I can't believe I've been on TpT since I started teaching back in 2011! OMG. I have loved seeing how this community of teachers has grown over that time - and some of it I miss....like, the pre-teacher influencer phase....but that's another post for another day...

...this summer I've been taking a peek around my shop and noticed that I haven't updated quite a bit of resources. I love a good purge and refresh and that's what I'm doing as I prep my store for TpTs upcoming Back to School Sale!

So, what's getting a refresh?? Let's take a peek!

Literacy Center Rotation Cards 


NEW! These literacy station rotation cards have a brand new look and are just $1! I took a peek at my old set and they were just so representative of the time I made them, lol. Now, they've got a new look and keeps literacy station rotations simple.


I love the Daily 5 and I love seeing that it's still being utilized - even after all of these years. My new cards continue to represent the various stations included with Daily 5. These stations include:

  • Work on Writing
  • Library Station
  • Word Work
  • Write the Room
  • Technology Station (great for learning apps)
  • Meet with Teacher
  • Guided Reading
  • Read to Self
  • Buddy Reading
  • Listen to Reading (can be a listening station or reading apps like Epic Books)
  • Book Club (can be for upper grades)
  • Creation Station (a craft/art station related to earlier read aloud, seasonal, etc.)
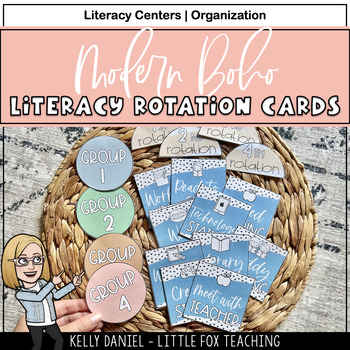
As always, if there are any stations not included, be sure to email me: littlefoxteaching@gmail.com and I'll be sure to add it!

Be sure to grab your copy today!


Happy teaching!


Boho Minimalist Reading Rotation Cards

July 30, 2024

July 29, 2024

Classroom Setup '24


Welcome to my classroom!


This upcoming year I am inheriting a brand new classroom at a new campus, in a new city, and a new (somewhat) grade level. There have been a lot of transitions this last month, but ones that are exciting. After our move from Texas this summer back to San Diego, California, I was excited to be able to get into my classroom early and begin unpacking and setting up.


We all know that inservice week brings time in classrooms, but most of that week is prep, planning, and meetings. So, to have this extra time to build my classroom is a gift.


Arranging Furniture

First things first: gotta sort through what the previous teacher left behind - or in my case the long-term sub - and begin arranging the learning spaces.

This is often the most overwhelming compared to entering into an empty room. However, I am grateful that certain pieces of furniture have been left behind. After some time, I was able to sort of organize the big pieces of furniture into spaces I imagine will get the most use. I did peek into my teammate's classroom just to get an idea of how she uses her space - which was helpful.

The main areas I want to focus on are: 
  • meeting area near TV (which is where I plan to have us spend the most time together)
  • teacher desk with access to small group table
  • student desk arrangement (18 students)
  • classroom library
  • writing materials area


I am in need of a few more student desks (so, nevermind the random desk and chairs in the middle). I will have a total of 18 students this year, which is so manageable! But, when arranging the classroom the big thing to keep in mind is how much space these 2nd graders need and how they'll use the classroom throughout the day.

I want to keep table groups to 3, so that means 6 students at each table group. We'll see how that works out once students arrive. A lot of this year will be a test-run of a lot of things! Thankfully, the room arrangement can always be adjusted once the school year starts and I get a feel for how we need to change and adapt things!

Small Groups

Here is my planned small group table where I will meet with students throughout the day. I wanted this space to be easily accessed from my desk area and give me the best view to monitor my class. I will also have a homeroom teacher that comes in and assists with students (how amazing is that?!) and this will also be a great space for her to use when working with the kiddos.

In this space I plan to use the bookshelf behind the table for my small group reading and math materials. I love the plant that was left behind, so I have that right there, too. To the right of my small group table I plan to have writing materials and a kind of writing area. That's the goal, at least.


Future Sound Wall

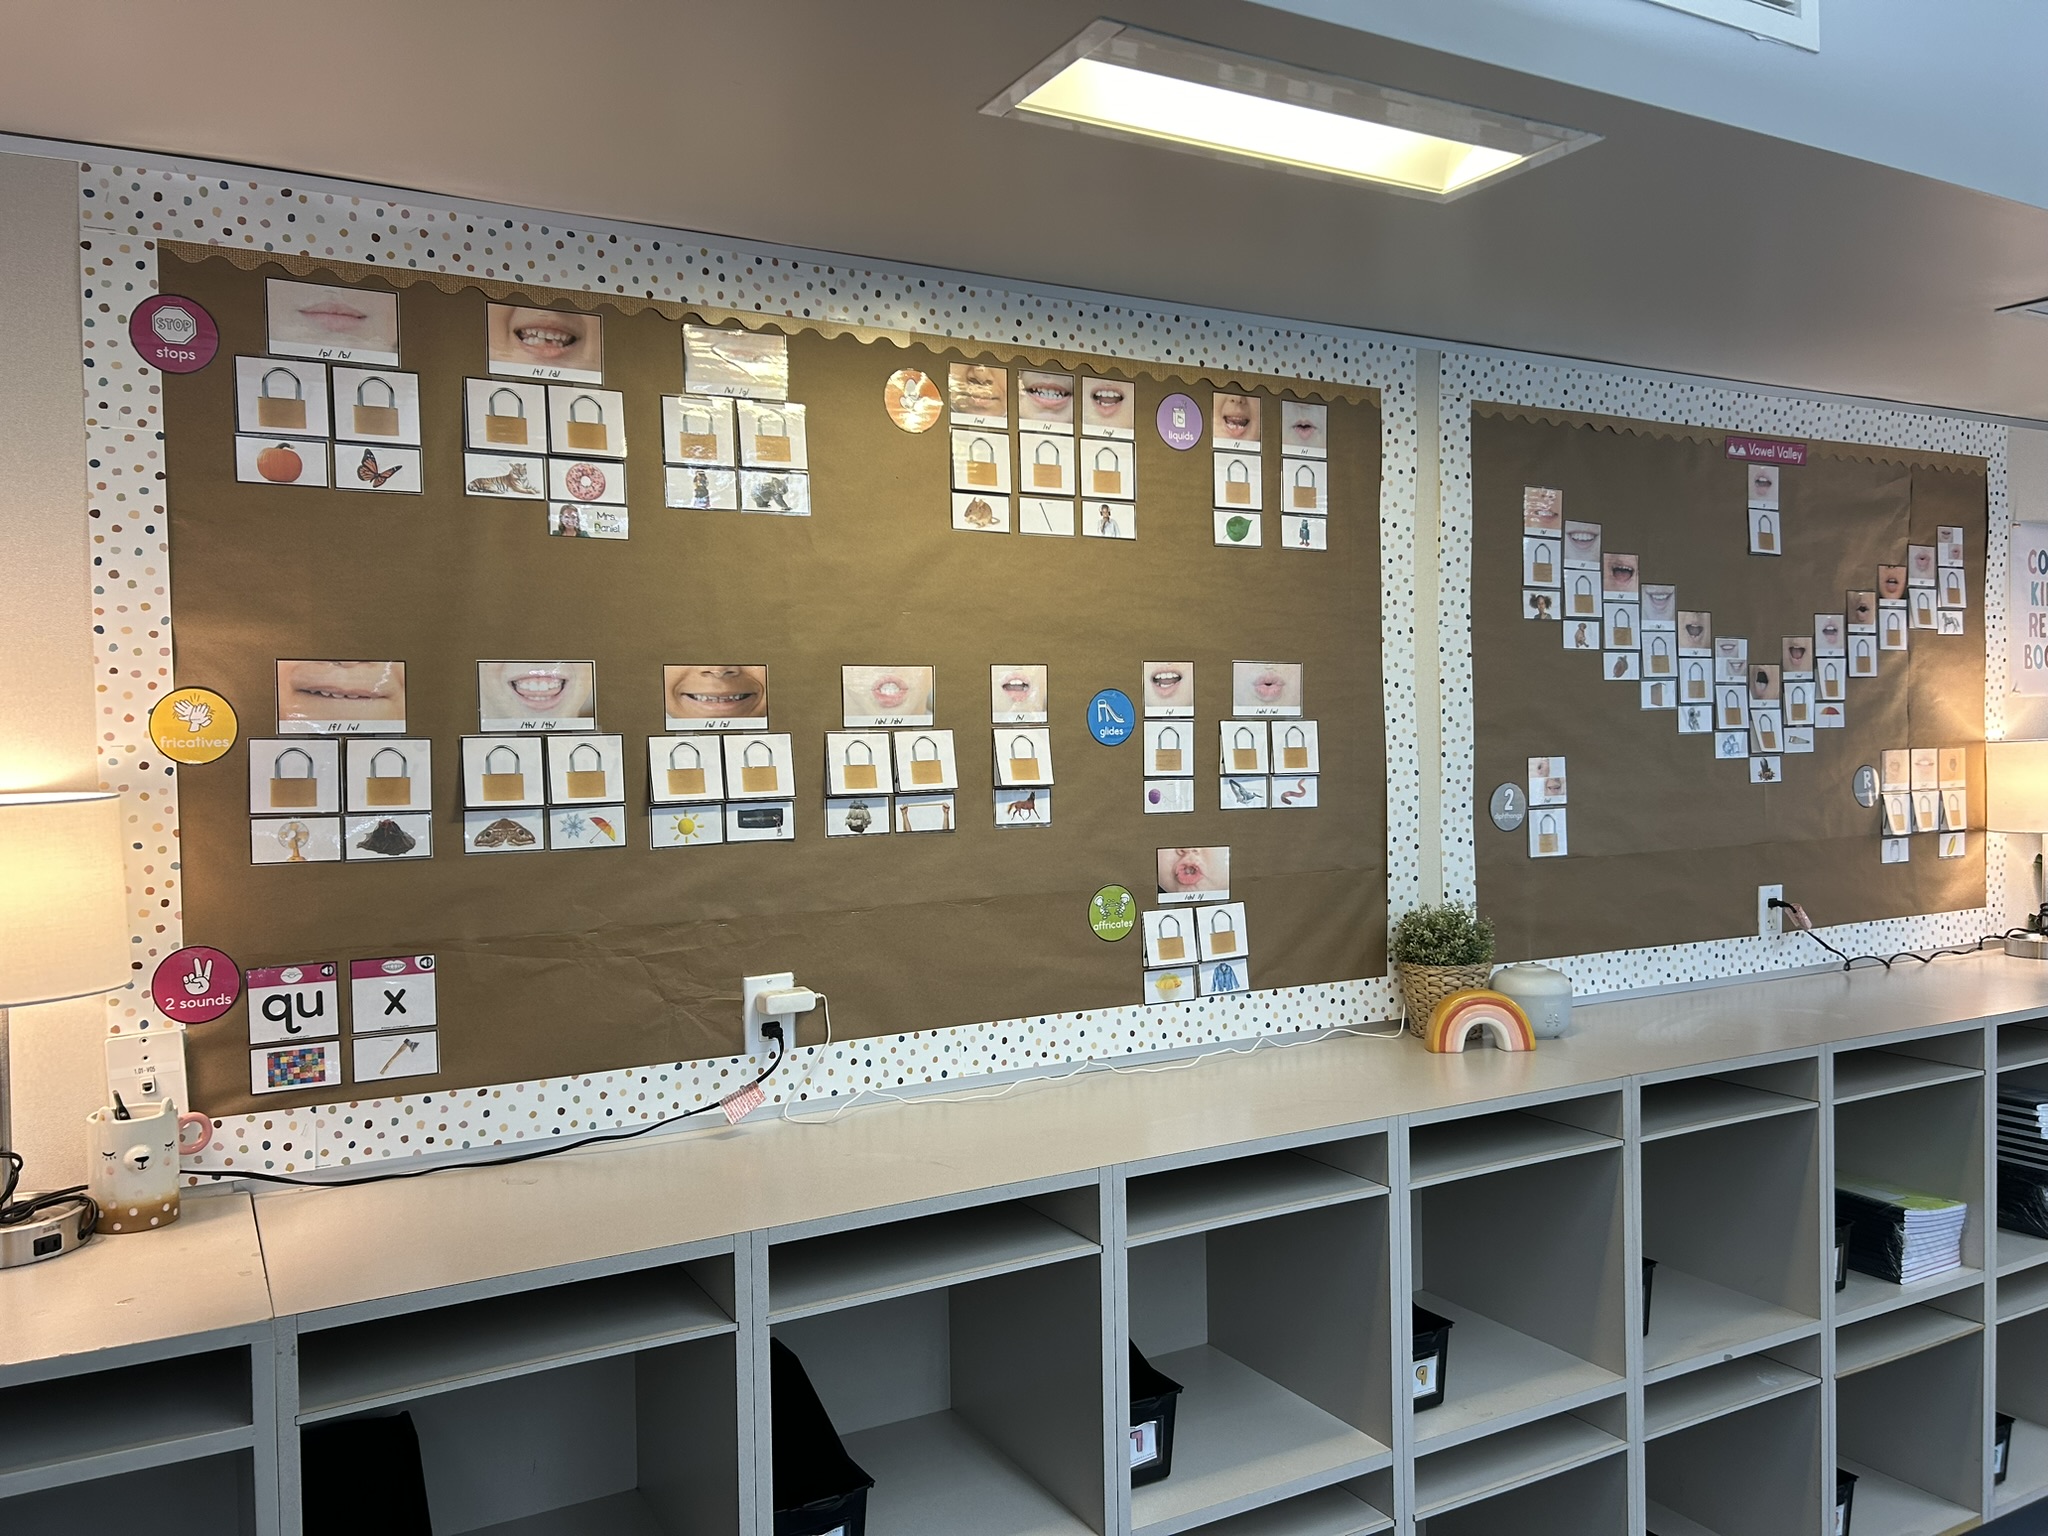
Coming into this classroom I quickly noticed this massive word wall. This wall is the only real wall space I have in my room (mostly due to the large windows I get!) and it will become my sound wall. I do plan to incorporate words from this list onto the sound wall, but it will be generated by the class as we unlock sounds and introduce words.


I loved getting to use my sound wall at my previous campus in kindergarten and I can't wait to incorporate one in 2nd grade. My plan is to condense the sound wall into just a few panels, so I can utilize the rest of the wall space to other things. My new campus uses the UFLI curriculum, which has a lot of the same components to what I've been trained in previously. 

Here's my new wall!


I used butcher paper and picked up these cute "Everyone is Welcome" border from Lakeshore Learning. My sound wall is from Natalie Lynn and can be found here.

As far as these amazing counter tops over the cubbies, I plan to have various bins for student work and materials. But, for now I'll keep them bare and utilize them as we unlock certain learning spaces when students come.

Classroom Library

I am so grateful that my new campus provides so many amazing book choices for our classroom library. However, with how I want to arrange my room I need more shelving to house those books. At first, I made this space a little small only because I'd want my students to be able to read wherever makes them comfortable. Then, I quickly realized just how many books I have to organize....and not to mention, 2nd graders are bigger than kinders...so there's that.


I am planning to expand my library space and add more shelves thanks to Facebook Marketplace. I want to make this reading space a welcoming environment and open for students to be comfortable while reading.

I added this wall space for anchor charts and continued organizing the library itself. There were a lot of amazing chapter books and series hiding in one of my closets! I set out to get them organized and I'm happy so far with how the classroom library has come together.


We'll, for now that's what I've been able to do in my classroom over the summer. I look forward to August where we'll be heading back officially and things will really start to come together. I can't wait to get my class list, prep with my team, and get a feel for how the first week of school will feel.

Being new has me with the school-year-scaries...but it's a good feeling. I always say that if you no longer get the butterflies before a new year maybe it's time to transition out of the classroom. But, this year feels really good. I'm feeling confident and I know I have a great team to support me. There's a lot of new things heading my way this year being at a new school...but I can't wait to get started!

A final note...


Feel free to follow along this journey with me here, but also on my Instagram and Facebook. I know a lot of this online/social space has become filled with teacher influencers...and I am definitely not one of those. I love the "old school" way of documenting and sharing my adventures in the classroom in a way that's authentic and helpful to other educators...at least, that's my hope.

So, I hope you'll stick around and I would love to connect with you here or on the socials.

Happy teaching!

Take a sneak peek into my 2nd grade classroom!


Classroom Setup '24

July 29, 2024

August 27, 2023

Meet the Teacher & Room Reveal 2023

It's officially back to school for me and I can't believe I'm on the eve of the first day. So many teacher friends of mine are already back! My district has us starting much later than usual, but nevertheless, I'm excited to kick-off our first day tomorrow!


Today I wanted to jump on here really quick and share with you my room and a little bit about my Meet the Teacher!


When you enter my room you'll see a little Student Center bookshelf on the left. On this shelf is where students can find:
  • the turn-in bin
  • Friday Folders (a weekly take-home folder that has student work from the week and any important items from school - it comes back Mondays)
  • Tissues, hand sanitizer, etc
  • Clinic office passes
  • math, reading/phonics, and social studies/science notebooks
  • and table group caddies that have additional communal supplies (I have a table manager job who will be responsible for handing out and collecting these caddies for their table group)
On the wall I have pockets where I place important flyers or extra copies of handouts that need to go home. It's also a great place to keep reminders and other items. 

(All faux plants are from Ikea).
(Paper awnings from Hobby Lobby - similar)

Small Group Table

A new idea that I'm trying out this year is swapping my kidney table for a circle table. I like that it doesn't take up as much space and I'm able to put it near my teacher desk (which is IDEAL for me). I use these Ikea stools or students can stand - whichever makes them most comfortable. I then use a small rolling cart for my reading/math small group supplies.

You'll also notice that I invested in my own fan. I found myself getting hot last year (even with air conditioning) and it is great for when we have lots of visitors in the classroom...like Meet the Teacher!


On top of the cubbies will eventually be the wooden picture frames I have students decorate. This is a fun activity where students practice using their supplies as we introduce them. Inside the frames I have my student families bring a 4x6 family photo and it not only creates a warm atmosphere/community in our room, but it's there for when students get in their sad feelings and miss their family. I allow them to sit with their picture for a few moments and they place it on my desk when they're ready to return to the carpet/class time. I then place their frame back up above their cubbies.

Hanging from their hooks are student lanyards. Inside them I place a tag with their name and teacher and on the back I laminated colored construction paper since our specialists are trying a new color-coding system. I also place their lunch cards so going to lunch is a breeze these first few weeks. I have students use these lanyards daily for the first month or so as everyone gets to know each other and remember names. These also help our specialists learn names as well.

Phonics/Small Gathering Area

This year I wanted to create a space where students could gather with me for phonics or other smaller group activities like writing or math time. It will also double as our classroom library during reading centers and a play space for our dramatic play/interventions time at the end of the day.


During phonics, I plan to have students gather in this area facing our Sound Wall. This is when we will review our sounds that we've unlocked together. I also have the use of our white board and other tools for various phonics mini-lessons throughout the year. The intention is to make the "library" a more useful space as a class and I love the concept of students being physically in a different space during different parts of our day together.


(Black rug is from Target)

My MISC Table

Since ridding my classroom of my kidney table, I have this newfound space and at first I struggled with what to put here. So, I thought about last year and noticed that my students loved finding spaces where they had flexible seating options - and a lot of them loved standing. So, I grabbed this rectangular table (but smaller than our table group tables) and placed it here.


(The red bins here will house my reading center activities and the blue bin is where I'll place reading Write the Room activities. On the trays will be various writing paper options for students.)

The plan for this space is my 'MISC area'...meaning it's kind of a space for all things. 

At Meet the Teacher it's my transportation station where parents filled out their child's dismissal tags that go on their backpacks. During the school day it will be a writing station during reading centers, an optional writing table for those who want to stand and have some space when writing, a math table for hands-on centers, and a misc table during dramatic play. I like that this space kind of formed itself and that students can choose what they'd like to do while working there. 

We'll see how it goes!

(Peg Board (Ikea), I used their attachment to attach to my table)
(Peg board accessories (Ikea) for writing materials/tools)

Meet the Teacher


For the last couple of years I have incorporated a Parent Packet as well as a mini-scavenger hunt for my student families. Meet the Teacher is a quick opportunity for parents to drop off supplies and students get a chance to meet me and get a feel for the classroom.


(Green bins at the front of the room will house my hands-on math center activities).

At each table group I have my seating arrangements made - but, of course, these seats will change as needed. In each packet I have info for my classroom as well as any forms from the school. I also place the keychain I made for my students and their plastic crayon box at their seats.

The reason I have a scavenger hunt is mainly for students and their parents help me with the BTS organization. At their seats students will build their pencil boxes as well as place their other supplies in containers around the room. Their pencil boxes will then go to their cubbies and be ready for the first day of school. The other supplies can just be tucked away for the time being and organized into my drawers in the coming week.

This system saves me a lot of time upfront and gives families something to do while I'm greeting students and meeting my new parents. I'll check in periodically and make sure parents know what to do. The final step on their scavenger hunt is to take a picture with me! It gives them a little keepsake and it lets me know when they're finished. I'm able to say goodbye and chat for a moment before the first day.

Each year it seems to be a hit and makes Meet the Teacher feel less chaotic. 


Well, that's it for now!
Happy teaching, everyone, and happy back to school!


Meet the Teacher & Room Reveal 2023

August 27, 2023

August 13, 2023

Meet the Teacher Student Keychains Tutorial


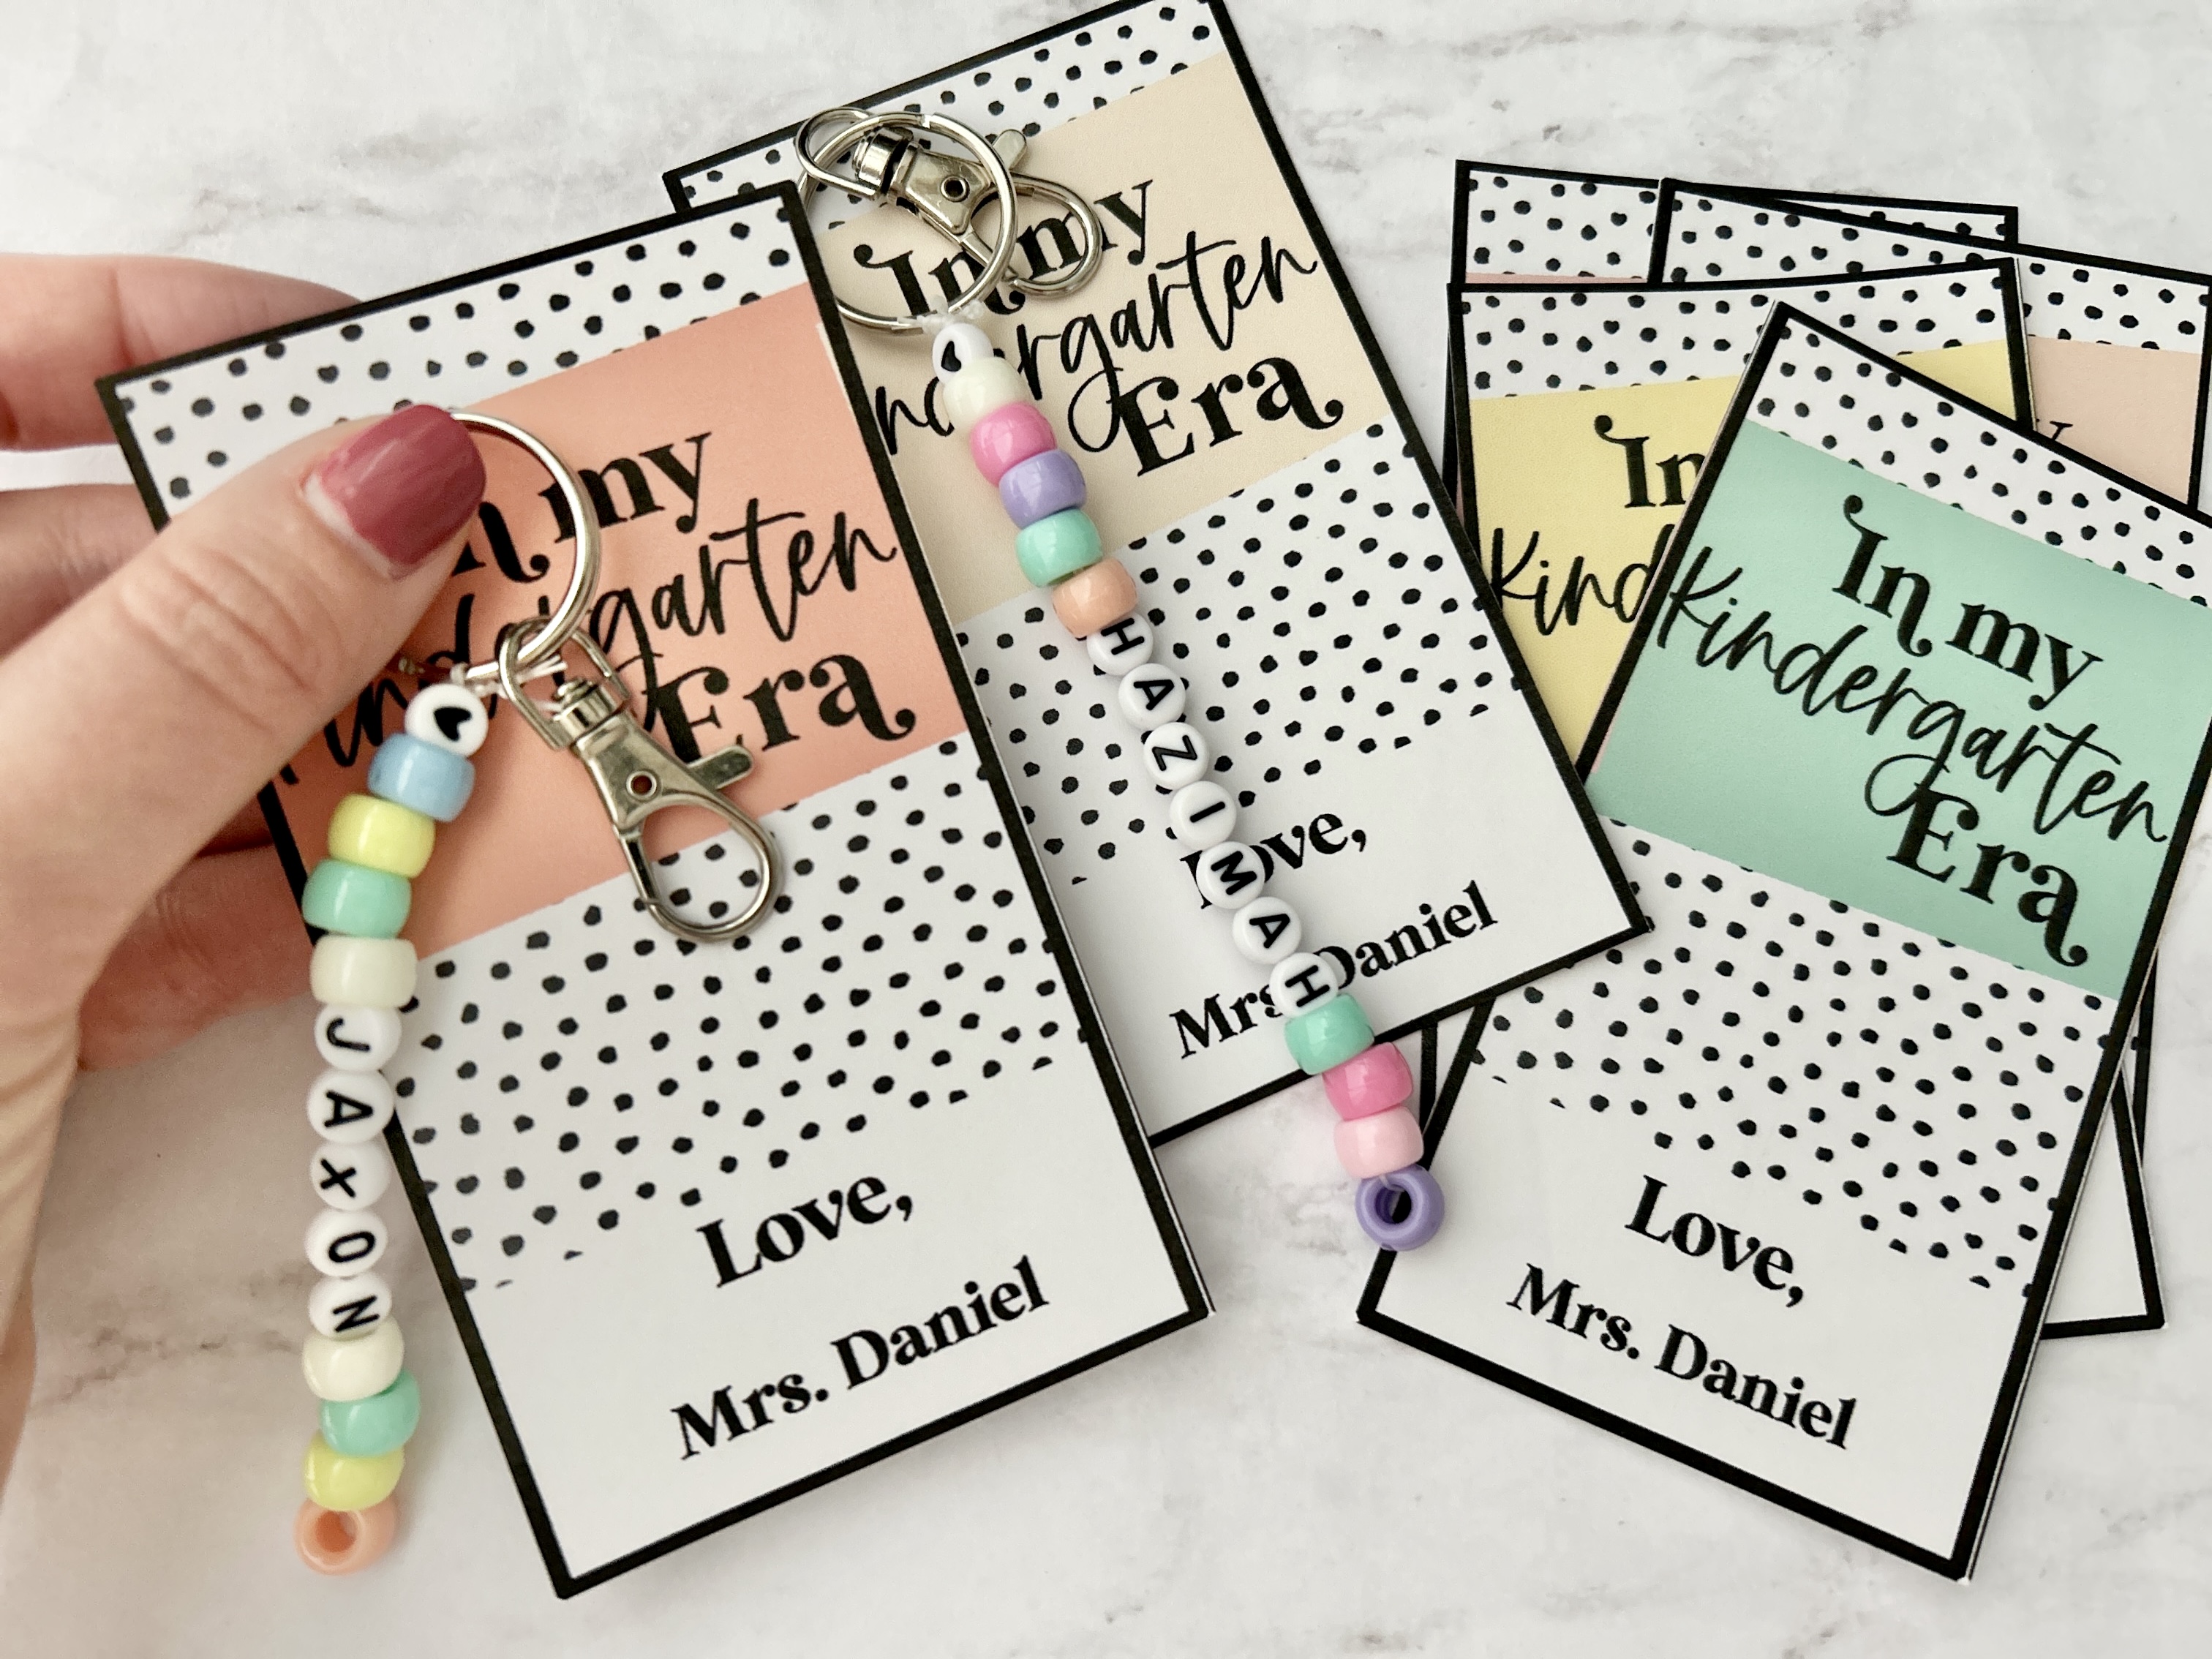
At the beginning of the year I always love gifting my students with a little something at Meet the Teacher. For a brand new kinder, many of which are coming to a big new school for the first time, can have all the feelings from excitement to nervousness...and all at the same time. As a way to gently welcome them into our classroom I make these personalized keychains that they can use on their backpacks (or anything they choose!). Boys and girls alike adore them and I know the parents appreciate the sentiment.

So, skip the candy and snacks and opt for this easy peasy DIY student keychain (grab the gift tags here)!

Here's how you make them:

Gather your supplies

Amazon affiliate links used within this post


Materials Needed:
I sourced all of my materials on Amazon, but your local craft store is a great place to look for many of these supplies.


Assembling the Keychains


Step 1: String your beads

Use enough elastic string so that you can string all of the letters in each student's name as well as have room for the colorful pony beads. 

Note: my string is a little small for the pony beads (oops!) so I have to tweak how I tie them together. You'll see how I do this at Step 2...

You'll select a few colors of pony beads and begin to string it on as shown...


Then, the trick is to thread both sides of the string through the next pony beads. This will secure the bottom bead onto the keychain (see below).


Step 2: Assemble student letter beads

Next, you are going to thread the letter beads to build your student's name followed by more pony beads. This is where you can get creative with your coloring and style. I kind of chose my colored beads based on whether it's a boy or girl...but it's completely up to you!

Now, this is where I had to get creative. My alpha beads and pony beads are two different widths in terms of their opening. So, I use a heart bead at the end of the keychain to secure it all together. Simply knot it off (making a knot about 3-4 times so the beads don't slip off).


Step 3: Attach to keychain clip

Now that you have a finished keychain all you need to do is knot it around the clip. Again, I knot it about 3-4 times to secure it so the beads don't fall off.


Step 4: Attach to gift tag and hand out!

The final step is to attach the keychain to a cute gift tag and lay them out for Meet the Teacher/Open House. I put them at their seats when they arrive, but you can hand them out at the end. Totally up to you!


These gift tags are made for Pre-K thru 6th Grade and are editable right in the PDF. Simply type your name and print. You can use a hole-punch and clip your keychain right on!

Recommendations:

  • I recommend having your materials on hand at school so that you can quickly make a keychain for any students added last second to your roster. 
  • I also hold onto any keychains of students who didn't attend Meet the Teacher/Open House. I'll make sure to lay them out on the first day of school.
I hope you enjoy your new school year and...happy teaching!


Meet the Teacher Student Keychains Tutorial

August 13, 2023